 BlueJ Git Tutorial
BlueJ now supports Git repositories as part of its teamwork features. This tutorial briefly explains how to use the new Git support on Bluej.
Contents
- Introduction to version control and Git
- Creating a Git repository
- Opening a project from a Git repository in BlueJ
- Sharing a BlueJ project with Git
- Checking the project status
- Committing and pushing changes
- Updating your project
- Checking project history
Introduction to version control and Git
It is important to learn some basic Git terminology:
- Working copy: The place where your BlueJ's shared project is located. Whenever you make any changes to your files in your shared BlueJ project, you are making those changes in the working copy.
- Local repository: A local Git repository is stored in the same directory as the BlueJ project itself. It is a subdirectory called '.git' that contains all the files needed in order to perform the version control operations (keep track of files changes, deletions, etc.). You should not touch this directory.
- Remote repository: A remote Git repository is used to keep track of your shared BlueJ project, but resides in another computer. It is usually used to share code with other developers: you can push your changes to the remote repository, and you can pull changes from the remote repository into your working copy.
Creating a Git repository
There are several web-based Git repository hosting service. They can be a good option if you want to very quickly and easily create repositories to host your BlueJ projects.
We talk about some of the most popular web-based Git repository hosting services below.
GitHub
GitHub is one of the most popular a web-based Git repository hosting service. It provides a web-based graphical interface where you can see your repository, its files, commits, etc. It also provides forums where you can discuss features in your projects, and a wiki engine where you and your collaborators can create documentation for your project.
In order to use GitHub, you should create a completely empty repository. You can find a tutorial on how to create your GitHub repository here. Important: in step 5, UNTICK "Select Initialize this repository with a README", so that you get an empty repository.
After your create a new repostory, GitHub shows a screen with the typical usage of the repository using the Git command line commands (Figure 1), but this should be ignored: BlueJ will will perform them automatically when checking out a project. Make note of the repository address (below the phrase: "Quick setup - if you've done this kind of thing before"): you will need to use it together with your GitHub username and password to share a project into or checkout a project from this repository (see the instructions in the following sections).
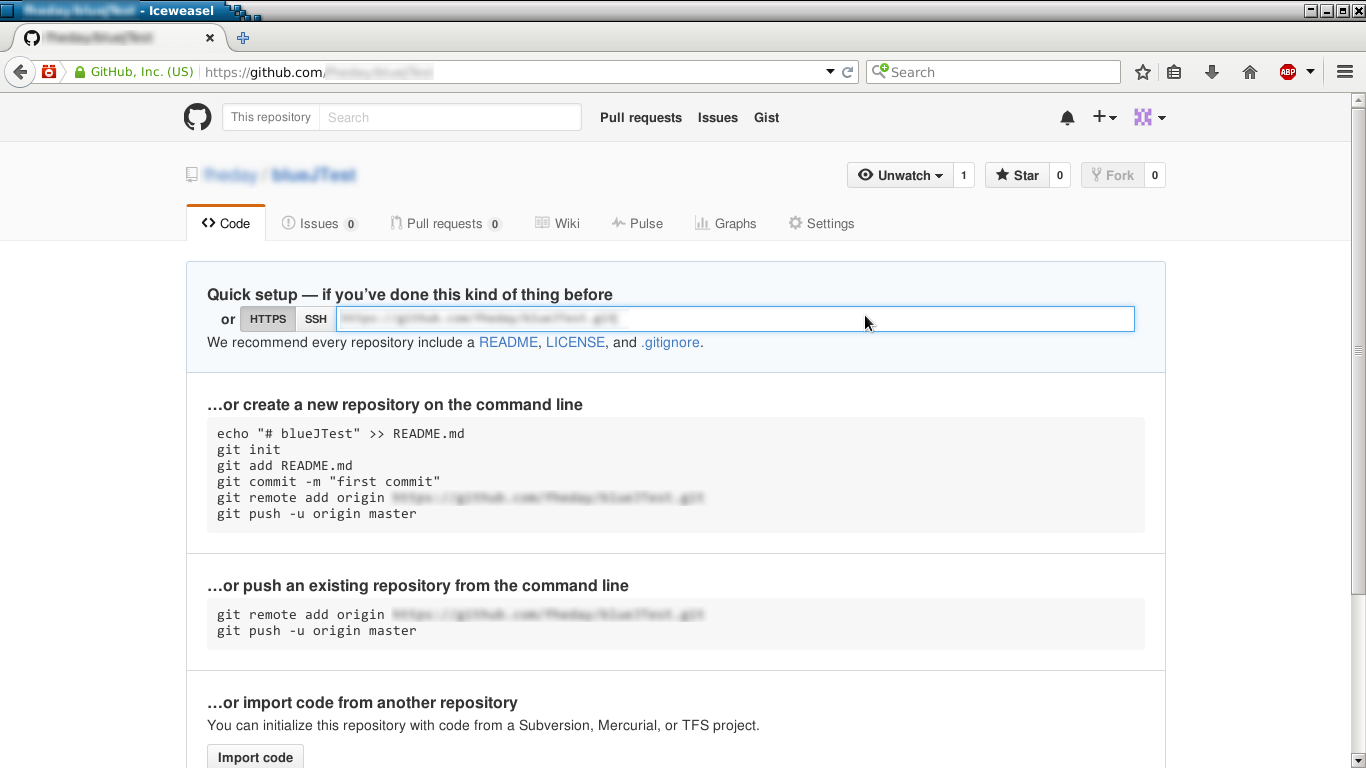
On GitHub we recommend you use the https URI, since BlueJ uses username and password authentication.
Bitbucket
Bitbucket is a web-based Git repository hosting service, similar to GitHub. One of its differences from GitHub is that you can create free private repositories limited to 5 users.
You can find a tutorial on how to create a Git repository in Bitbucket here. Important: change the "Include a README?" setting to No to get an empty repository.
GitLab
GitLab is an application to code, test and deploy code. It provides Git repository and has integrated code reviews, issue tracking, etc. Differently from GitHub and Bitbucket, it can be installed in your local network.
Given you have GitLab installed in your network, You can find a tutorial on how to create a Git repository here.
Sharing a BlueJ project using Git
Once you have your empty Git repository set, you may want to share your BlueJ project with other users.
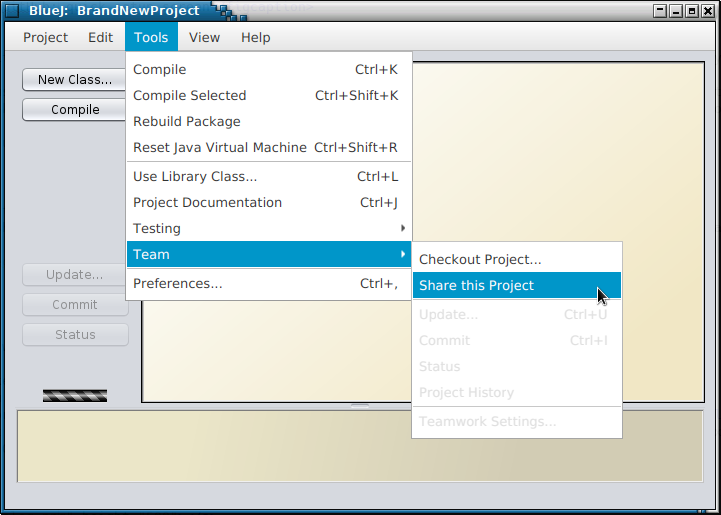
In order to do so, open the existing project you want to share. Select: Tools -> Team -> Share this project menu option (Figure 2). You should see a dialog similar to the one in Figure 3.
Select "Git" as your server type. This will allow you to enter:
- Your name: The name associated to the changes you make to the repository.
- Your e-mail: The e-mail associated to the changes you make to the repository.
- User: The username used to access the remote repository. This is usually your login in the remote repository, and it is usually case sensitive.
- Password: The password associated to the username.
- Repository URI: A URI containing the address of your Git repository (ex: https://github.com/jdoe/BrandNewProject).
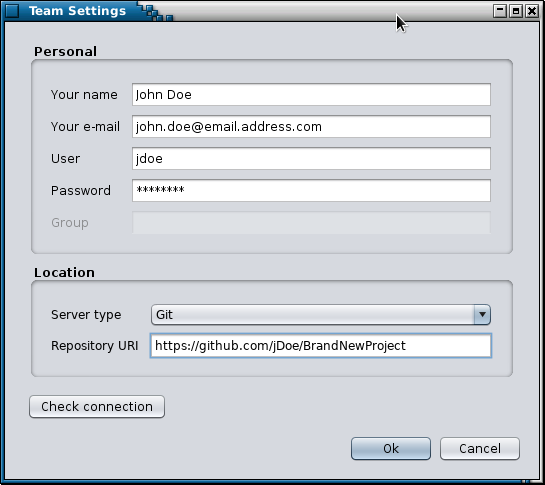
Tip: It is good practice to click on the "Check connection" button: this button tests if BlueJ can connect to the remote repository and if the URI does contain a valid Git repository.
Opening a project from a Git repository in BlueJ
In order to open a project previously shared on a remote Git repository, you need to create a local clone of the remote Git repository (this operation should be done only once). This local clone of the project can later be open and used just like a normal BlueJ project. To create the local clone of the project in BlueJ you need to execute the command "check out project". It can be accessed by going to the menus: Tools->Team->Checkout project...
Then a dialog similar to the one in Figure 3 will appear.
Note: The Check out command in BlueJ is acutally performing a 'clone' operation to create a local copy of the repository, with the main branch checked out into the working copy.
You should select "Git" as your server type. This will allow you to enter:
- Your name: The name associated to the changes you make to the repository.
- Your e-mail: The e-mail associated to the changes you make to the repository.
- User: The username used to access the remote repository. This is usually your login in the remote machine, and it is usually case sensitive.
- Password: The password associated to the username.
- Repository URI: A URI containing the address of your Git repository containing the BlueJ project (ex: https://github.com/jdoe/BrandNewProject).
Tip: Click on the "Check connection" button: this button tests if BlueJ can connect to the remote repository and if the URI does contain a valid Git repository.
After clicking on "OK", you should now select where you want BlueJ to checkout the project in your machine. You should choose a name for your project. The project name will be the folder's name.
Checking the project status
Once you have a shared project, it is likely that either you or other users made changes to the project, therefore, it is important to know if you have changes that are ready to commit to your local repository, or changes ready put in the remote repository (push), or if you need to update your local project because someone made a change in the remote repository.
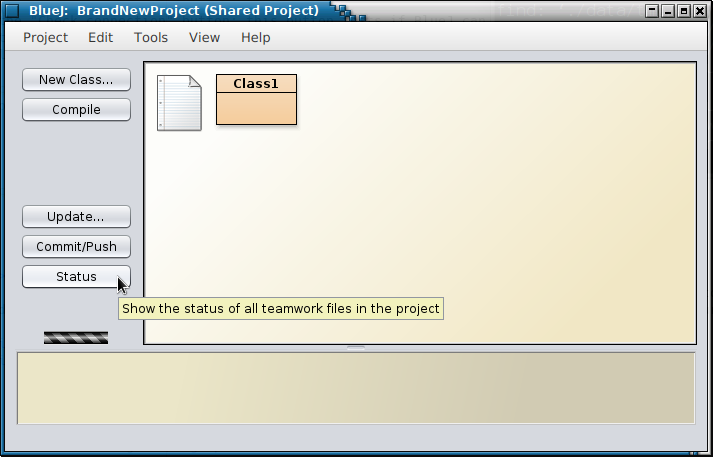
This information is presented on the status dialog, which can be displayed by pressing the "Status" button on BlueJ main screen (Figure 4)
You can see the status dialogue below:

The Figures 5 and 6 have three columns:
- File name: The files that are being tracked by the version control. These are the project .java files, the Project's README.TXT file, any subfolders and the Diagram layouts (a Bluej special file that helps drawing the class diagrams).
- Local status: The status of the files in the working copy relative to the local repository.
- Remote status: The status of the listed files relative to remote repository: in Figure 9, we can see that a push action would create "NewClass.java", modifty "README.TXT" and remove "Class2.java".
A file can have one of the following Local status:
- Blank: The file is up to date in the local repository and no changes should take place.
- New: The file is new in the working copy. A commit would make Git track the file and add it to the local repository.
- Modified: The file exists in the local repository, but has been modified in the working copy. A commit would save those changes to the local repository.
- Deleted: The files exist in the repository, but it was deleted. A commit would remove the file from the repository.
- Needs pull: This status can only appear in the remote repository, and it is always in conjuction to one of the previous status, indicating which effect a pull would make in the remote repository.
- Needs update:This status can only appear in the remote repository, and indicates that your local file is older in comparison to the one in the remote repository: you need to perform an update.
A file can have one of the following Remote status:
- Blank: The file is up to date in the remote repository and no changes should take place.
- Needs pull: This status can only appear in the remote repository, and it is always in conjuction to one of the previous status, indicating which effect a pull would make in the remote repository.
- Needs update:This status can only appear in the remote repository, and indicates that your local file is older in comparison to the one in the remote repository: you need to perform an update.

Committing and pushing changes
Commit
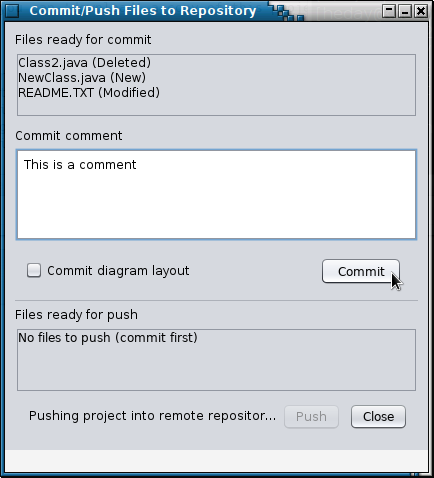
As you make changes in your project, you may want to put those changes into your local repository. This way you may share those changes with other users, by pushing changes into the remote repository.In Figure 7, we show the commit/push window. In the window we can see a list of files ready to commit: These files have modified in some way since the last time an update was made: you may have delete some of them (Class2.java); or created new ones (NewClass.java).
You will need to write a comment in your commit: what are the new changes that you made in this commit? this is important as a way of describing what these changes do. This comment will be written in the repository log and are a useful way of quickly and clearly communicating your changes to other users.
The commit is done by pressing the Commit button. You don't need to be connected in order to make commits: Git is a distributed version control system, which means that you have a fully functional local repository inside your BlueJ project, and when you commit you are actually putting your changes to this local repository.
Push
After commiting you changes to your local repository, they are ready to be pushed to the remote repository, where they can be shared by the other users. You can see the list of files ready to be pushed in Figure 5.
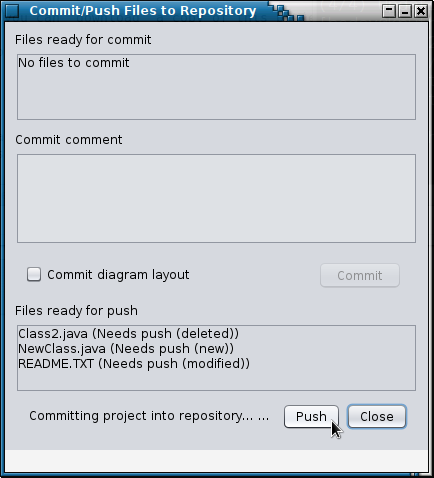
You need to be able to connect to the remote repository when you push. BlueJ may ask for the password to connect to the remote repository.
Checking project history
BlueJ offers a way of looking into the repository log where you can see the commit messages, files affected by each commit and the user who made the commit. You can access the repository log by opening the menus Tools->Team->Project History. An example of an entry can be seen in Figure 9.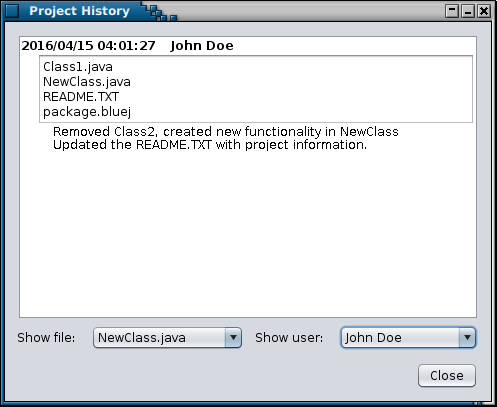
In big projects, or projects with many participants you may have a quite long history. For that purpose, we added two filters at the end of the window: "Show file" where we display only the commits that contains the selected file, and "Show user", where you can see the only the commits of the selected user.
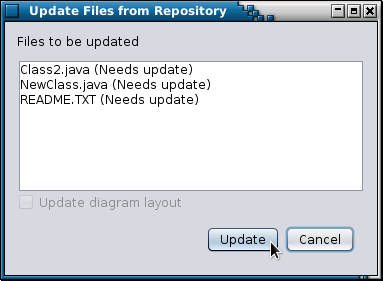
Updating your project
Pressing the "Update" button on the man screen will open the update window (Figure 10), there you will see the list of files affected by this update. To update, you should press the "update" button.
Support
Please see support page.